LinkedIn Headshots for Tech Professionals: Styles, Costs & DIY Guide
LinkedIn headshots are a business portrait that is commonly used for press releases, business cards, company websites, and, of course, LinkedIn profiles. Whether you’re a software engineer, product manager, UX designer, or CTO, a strong, polished portrait can influence how clients, recruiters, and peers view your expertise.
The best LinkedIn headshots for tech professionals strike a balance between credibility and authenticity. You don’t need to copy a traditional corporate look, but you do need to present yourself as confident, approachable, and skilled. In this guide, you’ll learn why headshots matter, which styles work best for tech roles, how to take one yourself, and what options exist for every budget.
What Makes a LinkedIn Headshot Essential for Tech Pros?
Have you ever met someone and instantly liked or disliked them within seconds? Psychologists say most people form a first impression in just 1/8 of a second. That snap judgment can influence who gets hired, who earns trust, and who gets overlooked.
Today, those first impressions often happen online:
- Hiring managers check LinkedIn before interviews.
- Potential clients research service providers.
- Investors review executives before making decisions.
Your headshot is often the first thing these people see. For tech professionals, that image can speak volumes before they read your skills or achievements.
The numbers are clear: profiles with a professional headshot get up to 21× more views, 36× more messages, and 9× more connection requests than those without. In a competitive, fast-moving industry, that’s an advantage you can’t ignore.
What Are the Best Style Fits for Tech Professionals?
The right headshot style depends on your role, the impression you want to make, and your audience. Here are the three proven styles for tech roles:
The right headshot style depends on your role, the impression you want to make, and your audience. Here are the three proven styles for tech roles:
Clean studio look
- Best for: CTOs, tech founders, consultants.
- Attributes: Neutral or solid-color background, controlled lighting, polished attire.
- Why it works: Keeps the focus entirely on you and signals authority.
Natural light style
- Best for: Product managers, UX designers, creative tech leads.
- Attributes: Soft daylight, blurred office or coworking space background, relaxed posture.
- Why it works: Adds warmth and approachability while still looking professional.
Minimalist close-up
- Best for: Software engineers, data analysts, and technical specialists.
- Attributes: Tight crop (shoulders to top of head), monochrome or simple clothing, direct eye contact.
- Why it works: Emphasizes clarity and attention to detail, traits valued in technical roles.
Tip: Avoid overly stylized backgrounds, heavy filters, or distracting props. They can pull attention away from your expression and weaken the professional tone.
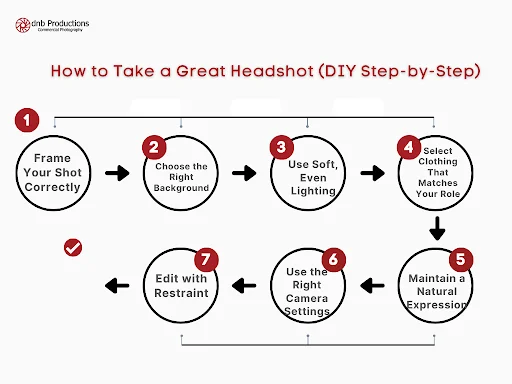
How to Take a Great Headshot (DIY Step-by-Step)
A DIY headshot can save money and give you creative control. With the right setup, even a smartphone can produce a LinkedIn-ready headshot.
1. Frame Your Shot Correctly
The framing of your headshot determines its professional appearance. For LinkedIn and most networking platforms, position the camera at eye level and keep the shot cropped from just below your shoulders to a little above your head. This ensures your face occupies about 60% of the image — the ideal ratio for online profile photos.
If you are using a smartphone, enable the grid lines and position your eyes along the top third line of the frame. This follows the rule of thirds and creates a balanced composition. With a DSLR or mirrorless camera, use a 50mm to 85mm lens to avoid distortion.
Examples of good framing:
Tight crop: For software engineers and data analysts who want to focus on facial clarity.
Shoulder-width crop: For product managers or tech founders aiming for a mix of authority and approachability.
Wider crop with blurred background: For UX designers or creatives who want context in the image.
2. Choose the Right Background
Your background should complement you, not compete with you. A cluttered or overly busy backdrop distracts viewers and reduces the professional feel. For indoor shots, pick a neutral wall in white, grey, or beige. For outdoor shots, use a shaded area with a softly blurred background — trees, modern office exteriors, or neutral architectural elements work well.
Good indoor background examples:
- A plain painted wall with no frames or decorations.
- A fabric backdrop (white, grey, or muted blue).
- A blurred section of an office space with warm tones.
Good outdoor background examples:
- A shaded courtyard with greenery.
- A modern glass building façade is out of focus.
- Light stone or neutral-colored walls.
Avoid green screens unless you are highly skilled in post-production editing, as they can create artificial edges.
3. Use Soft, Even Lighting
Lighting makes or breaks a headshot. Soft, even light prevents harsh shadows and highlights your features naturally. The easiest option is natural daylight. Position yourself near a large window, facing the light directly or at a slight angle. If shooting outdoors, choose early morning or late afternoon when the sun is low. Overcast days are perfect because clouds diffuse sunlight evenly.
For artificial lighting, use a two-light setup:
- Key light: Main light at a 45-degree angle from your face.
- Fill light: Softer light opposite the key light to balance shadows.
A ring light can work for beginners, but be careful with reflections in glasses. Professionals often use softboxes or diffusers to mimic natural light indoors.
4. Select Clothing That Matches Your Role
Your clothing should align with your role, industry, and audience. Solid colors photograph better than patterns. Avoid overly bright shades like neon, as they can reflect on your skin. Choose colors that contrast subtly with your background to avoid blending in.
Examples by role:
- Software engineers: Simple collared shirt or plain crew neck sweater in navy, charcoal, or white.
- Product managers: Blazer over a light shirt for authority with approachability.
- Designers: Clean outfit with one creative element, like a patterned scarf or a unique jacket cut.
Test outfits before the shoot. Take a few sample shots and check for wrinkles, transparency, or color clashing with the background.
5. Maintain a Natural Expression
Your expression communicates your personality before a recruiter reads a single word of your profile. Aim for a slight, genuine smile with relaxed eyes. Forced expressions can make you look tense or unapproachable.
Expression tips:
- Think of a joyous moment or person to lift your expression naturally.
- Keep your chin slightly down and your eyes level with the camera.
- Turn your body about 10–15 degrees from the camera for a relaxed but confident look.
For technical roles like software architecture or data science, a subtle smile often works best. For public-facing tech roles like sales engineering or community management, a warmer smile can be more effective.
6. Use the Right Camera Settings
If using a smartphone:
- Mode: Portrait.
- Resolution: Highest available.
- Stability: Use a tripod or stable surface, plus timer mode to avoid camera shake.
If using a DSLR or mirrorless:
- Lens: 50mm–85mm for flattering proportions.
- Aperture: f/2.8–f/4 for a blurred background.
- ISO: Keep under 400 to reduce noise.
Shutter speed: At least 1/125 to freeze motion.
7. Edit with Restraint
Editing should enhance your image without changing how you look. Adjust brightness, contrast, and white balance to keep skin tones natural. Remove minor blemishes or flyaway hairs, but avoid heavy skin smoothing that makes the image look artificial.
Recommended tools:
- Smartphone: Snapseed, Lightroom Mobile.
- Desktop: Adobe Lightroom, Capture One.
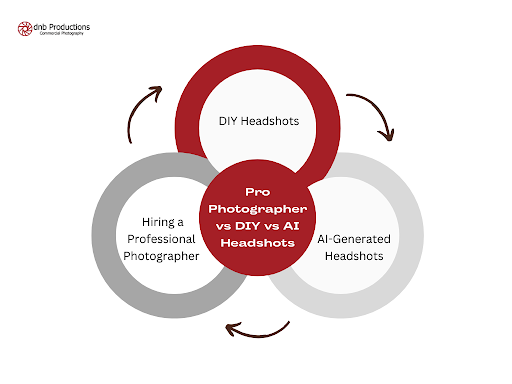
Pro Photographer vs DIY vs AI Headshots
There are three main ways to get a professional LinkedIn headshot: hiring a photographer, doing it yourself, or using AI-generated tools. Each method has benefits and trade-offs in cost, quality, and time. Choosing the right option depends on your budget, skill level, and the impression you want to make.
1. DIY Headshots
A DIY headshot is the most budget-friendly option and can be done at home or in your office. With a smartphone, tripod, and natural light, you can capture a professional-looking portrait without paying for a session.
Advantages:
- Low cost — Only requires a smartphone or basic camera.
- Full control — You choose the background, clothing, and timing.
- Flexibility — Can retake until you’re satisfied.
Limitations:
- Requires knowledge of how to take a professional headshot (framing, lighting, editing).
- Quality may be lower than a professionally lit and shot image.
Best for: People with photography basics who want to save money and have time to experiment.
2. Hiring a Professional Photographer
A photographer for professional headshots offers the highest quality and the least amount of personal effort. Experienced headshot photographers control lighting, composition, and posing to create an image that’s polished and tailored to your professional brand.
Advantages:
- Expert guidance — They direct poses, expressions, and clothing choices.
- High-end equipment — Cameras, lenses, and lighting produce sharper, cleaner results.
- Faster turnaround — Many photographers deliver edited photos within days.
Limitations:
- Cost — Rates vary widely. In the U.S., professional headshots typically cost $150–$500, but high-end photographers can charge $1,000 or more.
- Scheduling — Requires booking time and possibly traveling to a studio.
Best for: Tech professionals who want a guaranteed high-quality image without learning photography techniques.
3. AI-Generated Headshots
AI tools can create a professional-looking headshot from a set of your photos. Popular platforms like BetterPic, Portrait Pal, and AI SuitUp can generate dozens of variations for a fraction of the cost of a photoshoot.
Advantages:
- Cost-effective — Prices range from $27–$50 for multiple headshots.
- Fast turnaround — Often ready within 24 hours.
- Customizable styles — Choose backgrounds, lighting, and clothing digitally.
Limitations:
- Realism varies — Poor-quality uploads can result in unnatural images.
- Ethical concerns — Some recruiters prefer authentic, in-camera portraits.
- Disclosure — Surveys show 88% of hiring managers prefer knowing if a photo is AI-generated.
Best for: Individuals who require a quick and affordable headshot and are comfortable with a digital-only process.
How Much Do Headshots Cost for Tech Professionals?
The price of a LinkedIn-ready headshot for tech professionals depends on how you get it and the quality you want.
- DIY setup — $0–$150. Best for entry-level tech roles or freelancers starting out. Use a smartphone, tripod, and natural light to create a clean, professional look.
- Professional photographer — $150–$500 for most studio sessions. Mid to senior-level tech professionals, managers, and executives often invest here for a polished, brand-consistent image.
- Premium branding sessions — $600–$1,500+. Ideal for CTOs, founders, and public speakers who need multiple high-quality portraits for media and events.
- AI-generated headshots — $27–$150. A fast, low-cost option for interns, junior developers, or remote tech workers who need a quick LinkedIn upgrade.
Read More: How Much Does a Headshot Cost in 2025?
Frequently Asked Questions (FAQs)
What should I wear for a LinkedIn headshot in tech?
Wear solid colors that contrast with your background. Engineers often choose minimal, neutral tones, while managers and designers can add subtle pops of color for personality. Avoid busy patterns, logos, or overly casual clothing.
Check our related guide on: Best Colors to Wear for a Professional Headshot
How much do professional headshots cost?
Professional headshots typically cost $150–$500 for standard studio sessions. Premium branding packages can go over $1,000, while AI-generated headshots range from $27–$150.
How often should I update my LinkedIn headshot?
Update your LinkedIn headshot every 2–3 years or after significant changes to your appearance. This keeps your online presence current and recognizable to recruiters and peers.
Are AI-generated headshots good for LinkedIn?
Yes, if they look natural and professional. However, recruiters prefer authenticity, so use high-quality source photos and consider noting that your image was AI-generated if disclosure matters in your industry.
How do I find headshot photographers near me?
Search for “Professional Headshot Photography Services in Houston” on Google, check reviews, and browse portfolios to match the Style you need. For tech-specific portraits, work with a studio like DNB Productions that understands industry expectations.
Final Thoughts!
A strong LinkedIn headshot can shape how you’re perceived before anyone reads your profile. For tech professionals, it’s not just about looking polished — it’s about sending the right signal to clients, recruiters, and peers in a competitive industry.
Whether you capture it yourself, hire a professional, or explore AI-generated options, the goal is the same: a clear, authentic image that aligns with your role and personal brand. Update your headshot every few years or after significant changes in your appearance to keep your online presence relevant.
If you want a portrait that speaks to your skills, confidence, and approachability, consider working with a photographer specialist like DNB Productions. The right photo can open more doors than you think — starting with your subsequent LinkedIn connection request.
DNB Productions
Douglas N. Burns
we specialize in bringing your business to life through exceptional commercial and business photography.