How to Create a Professional Headshot at Home
Taking a professional headshot at home is easier than you might think! With a few simple steps and some creativity, you can create a high-quality headshot that conveys professionalism and approachability, without the need for a studio. You are updating your LinkedIn profile, enhancing your personal brand, or preparing for an interview, a polished headshot is a powerful tool.
This updated guide will take you through the steps of creating a professional headshot at home, featuring the latest tips and tools for 2024.

Steps to Create a Professional Headshot at Home: Latest Tips and Tools
1. Choose the Right Location
The location of your headshot plays a huge role in its overall quality. The backdrop should be clean and uncluttered. Here are a few tips for selecting the right spot:
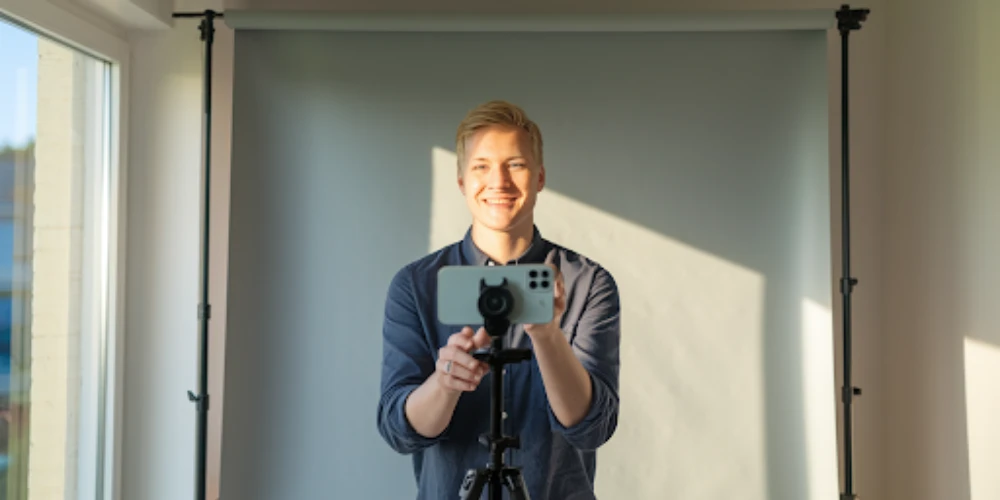
- Natural Light: The best lighting for a headshot is natural light, so try to position yourself near a large window or in a well-lit room. Soft, indirect light works best, so avoid harsh sunlight that can cause shadows or overexposure.
- Neutral Background: Choose a plain, neutral-colored background, such as a light gray, white, or beige wall. If you don’t have a suitable wall, a simple piece of fabric or a backdrop stand can do the trick.
- Clutter-Free Area: Remove any distractions from the background to ensure that the focus stays on you. A cluttered or busy background can distract from your face and message.
2. Set Up Your Camera or Phone
You don’t need an expensive camera to take a professional headshot—your smartphone or DSLR will work just fine. The key is to ensure your camera is stable and positioned at the right angle.
- Use a Tripod: If you have a tripod, set it up at eye level. If you don’t, you can improvise by stacking books or using a stable surface to position your camera or phone.
- Eye Level: Ensure the camera is positioned at eye level to avoid any awkward angles. The goal is to make your headshot appear as natural and flattering as possible.
- Front-Facing Lens: If you’re using a phone, ensure you’re using the rear camera rather than the front camera, as it typically has better resolution. A simple mirror or the camera’s self-timer can help you frame yourself correctly.
3. Consider Your Lighting
Lighting is the most important element of a great headshot. Here’s how to make the most of your available light:
- Natural Light: If you’re shooting during the day, position yourself near a window that lets in plenty of natural light. Turn off overhead lights, which can create harsh shadows, and avoid positioning yourself directly in front of the window to prevent overexposure.
- Soft Lighting: To avoid shadows on your face, position yourself so that the light falls evenly across your face. A softbox or a reflector can help diffuse light if you’re shooting indoors, but natural light can often be just as effective.
- Golden Hour: If you’re shooting outside or near a window, try to aim for early morning or late afternoon when the light is softer and warmer, creating a flattering, natural look.
4. Dress the Part
What you wear in your headshot should reflect your profession and personal style while keeping things simple. Avoid busy patterns or overly bright colors that might distract from your face.
- Solid Colors: Neutral tones or soft colors like navy, white, or gray are ideal. A simple blouse, shirt, or jacket can convey professionalism without overwhelming the photo.
- Avoid Logos or Busy Patterns: Logos or busy prints can detract from your overall look. Stick to solid colors or subtle textures for a clean and polished appearance.
- Fit and Comfort: Make sure your clothes fit well and are comfortable. You should feel confident in what you’re wearing, as it will help you relax during the shoot.
5. Mind Your Posture
Good posture is key to looking confident and approachable. Stand or sit up straight with your shoulders relaxed, and keep your head aligned with your body.
- Avoid Slouching: Slouching can make you appear disengaged or unprofessional. Stand tall with your shoulders back and avoid hunching over.
- Angle Your Body: A slight angle (about 10-15 degrees) to the camera can add depth and interest to the shot. Don’t turn your body too much—just enough to avoid being completely front-facing.
- Relax Your Face: A stiff or tense expression can give off a negative vibe. Relax your facial muscles and avoid forced smiles. A soft, natural smile works best.
6. Frame Your Shot
A professional headshot typically includes your head and shoulders, with your face the main focus. Here’s how to frame your shot:
- Eye-Level Composition: Make sure the camera is at eye level, so your gaze appears natural and engaging.
- Headroom: Allow a small amount of space above your head, but not too much. The focus should remain on your face.
- Avoid Cropping at the Neck: Your shoulders should be in the shot, but don’t crop too tightly around your neck. Ensure there’s enough space for your whole face and upper torso to be visible.
7. Take Multiple Shots
Don’t settle for the first shot! Take several pictures from different angles, varying your expression, and adjusting your posture. This way, you’ll have more options to choose from when picking the best image.
- Try Different Expressions: Experiment with slight variations in your smile and gaze. A serious, confident expression can work for some, while others might want to go for a friendly, approachable smile.
- Check Your Focus: Make sure your face is in sharp focus. Check your photos often to ensure that the lighting and composition are just right.
8. Edit the Final Photo
Once you’ve taken your photos, it’s time to polish them. You don’t need advanced editing skills—simple tweaks can make a big difference.
- Adjust Brightness and Contrast: Brighten up your face if the lighting was a bit dim, and increase the contrast slightly to make the image pop.
- Remove Distractions: Use editing software to remove any stray hairs, blemishes, or background distractions. But be careful not to over-edit; the goal is to enhance your natural appearance.
- Crop Correctly: Crop the photo so that your face is the focal point. Make sure the final image is centered, and don’t cut off your shoulders or head.
9. Upload and Use Your Headshot
Now that your headshot is ready, use it where it matters most—on your resume, LinkedIn, website, or any other professional platform. Make sure the image is high resolution and looks good in both large and small sizes.
Updated Tools to Create a Professional Headshot at Home
here are some updated tools and tips to elevate the quality of your photos:
1. Smartphone Camera Apps
Modern smartphones are equipped with high-quality cameras, and using specific apps can significantly improve your headshot:
- Halide (iOS): A powerful camera app that offers manual control over settings like exposure, focus, and white balance, making it easy to capture professional-grade photos.
- ProCamera (iOS/Android): Offers features like RAW photo support, low-light capabilities, and advanced editing tools for precise control over your shot.
- Camera FV-5 (Android): A comprehensive manual camera app that gives you DSLR-like control over your phone’s camera.
2. Lighting Tools
Good lighting is crucial, and there are tools to ensure optimal lighting conditions:
- Softbox Lighting Kits: A softbox with adjustable lighting is an affordable way to diffuse light and avoid harsh shadows. Brands like Neewer and LimoStudio offer kits starting around $50 to $100.
- Ring Lights: Popular for headshots, a ring light helps evenly light the face with a soft, flattering glow. They are widely available on Amazon for around $30 to $150, depending on size and quality.
- Reflectors: You can use a simple white foam board or purchase a professional reflector set (like those from Neewer) to bounce light onto your face and eliminate shadows.
3. Background Solutions
Creating a neutral, professional background is essential:
- Backdrops: Seamless paper or fabric backdrops, like those from Savage or Kate, can provide a clean, professional background. These typically cost between $30 to $100, depending on size and material.
- Portable Backdrop Stands: A stand helps you set up your backdrop and keep it taut. A basic backdrop stand typically costs between $50 and $150, depending on quality.
- DIY Solutions: If you’re on a budget, a simple white wall, or hanging a plain sheet of fabric, can work as an affordable backdrop.
4. Editing Software
Post-processing can enhance your headshot to look more professional:

- Adobe Lightroom: This industry-standard editing software allows for detailed adjustments to exposure, contrast, and color. Lightroom is available for a monthly subscription fee of around $9.99.
- Snapseed (iOS/Android): A free, mobile-friendly editing app with advanced features, including filters, healing tools, and lens blur, perfect for quick edits.
- VSCO (iOS/Android): Offers a wide range of filters and editing tools to give your photo a polished, professional finish.
5. Posing and Composition Tools
There are apps that guide your posing and composition to ensure your headshot is framed perfectly:
- Pose: Camera & Photo Posing Guide (iOS/Android): Provides posing inspiration for portraits, including tips on angles, posture, and expressions.
- Portrait Mode: Most modern smartphones have portrait modes that simulate a shallow depth of field, which can help blur the background and keep the focus on your face.
6. Remote Camera Shutter
To avoid camera shake and ensure precise framing, a remote shutter or timer app can be very useful:
- Camera Remote (iOS/Android): Allows you to control your phone’s camera remotely, perfect for taking hands-free photos.
- Bluetooth Shutter Remotes: Affordable devices (usually under $20) that sync with your phone or camera to take photos from a distance, ensuring you can take multiple shots without needing a photographer.
7. Online Tutorials and Posing Guides
- YouTube: There are numerous tutorials available that teach you how to use your camera, position yourself, and pose for a headshot.
- Skillshare: Offers paid classes on portrait photography, posing, and editing, helping you refine your technique.
Final Tips for a Great Headshot
- Avoid Over-Editing: Keep your edits minimal to maintain a natural and professional appearance.
- Stay Relaxed: If you feel tense during the shoot, take a deep breath and try to relax. The more comfortable you are, the more your personality will shine through in the photo.
- Consistency: Use the same headshot across all your professional platforms to create a consistent personal brand.
By following these steps, you can easily create a professional headshot at home that showcases your personality and professionalism. Remember, the goal is to appear approachable, confident, and ready for the opportunities that come your way!
Elevate Your Image with dnb Productions
At DNB Productions, we understand the power of a great image and are always here to help you create a visual representation that aligns with your personal brand and goals. Ready to take your headshot to the next level? Start today and put your best face forward!
DNB Productions
Douglas N. Burns
we specialize in bringing your business to life through exceptional commercial and business photography.
